Easy Wins For Website Performance Tuning
I recently embarked on a little journey to investigate various methods to improve the performance of a website, in this case a small static placeholder site of mine (might as well put something there) dand.ws. It’s hosted on shared hosting at Dreamhost, on Apache.
Why Does Performance Matter?
Website performance is known to be one (of many) indicator that Google use to rank sites. This means that if you’re trying to run a business, poor performance is probably costing your money. Even for a non-commercial website, the experience that a user gets can be dramatically improved if they don’t have to wait for each and every page to painfully load.
A service that I’ve used in the past that can be very helpful is WebPageTest.org, which will independently go to any site and check its performance. Alternative tools would include the Google Page Speed and Yahoo YSlow! browser extensions. All of these tools suggest tried and true ways to improve your site.
Where are we at?
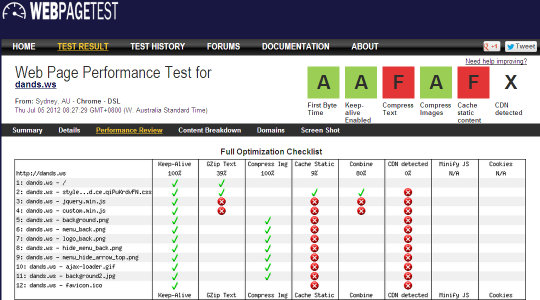
This is showing some good signs, with images being compressed to an acceptable level and pointing out the lack of text compression, caching or a CDN.
What can we do?
This post will describe a few steps to improve that load time:
- Optimise Images (lessens download)
- GZIP (lessens download)
- Set Headers (avoids re-download of already browser cached items)
- Setup a CDN (brings server closer to you)
- Minify Components (lessens download)
Optimise Images
I had previously compressed/tweaked the images to the best I could do with tools such as PNGGauntlet (for PNGs) and thought I had found a decent balance with various JPGs, but that was about it. I have recently run the PNGs through a new site a came across, TinyPNG, which improved only a couple by a few percent, but a gain is a gain.
I’ve also recently used smush.it to further tweak some of these images even more, another few bytes here or there, but one big (10KB) gain came from the GIF animation I’ve used for the background transitions. Which brings me to the backgrounds which I thought were pretty damn good, smush.it managed to eek out another 69KB in savings across the 9 files.
GZIP
A really easy first win is to use GZIP compression on the various data types you’re transferring. On the server, if it doesn’t already exist, create a .htaccess file in the root of your site. Add this to help Apache:
AddOutputFilterByType DEFLATE text/html text/plain text/xml text/css text/javascript application/x-javascript
SetOutputFilter DEFLATE
Set Headers
The second significant configuration you should do is removing ETags and then setting the Expires and Cache-Control headers. This gives a clear signal to the browser to say “this artefact wont change until <a-future-date>, you might as well keep it cached locally” which will mean that the page load time for a returning visitor will be dramatically lowered.
To your .htaccess file, add this:
FileETag None
<FilesMatch "(?i)^.*\.(ico|flv|jpg|jpeg|png|gif|js|css)$">
Header unset Last-Modified
Header set Expires "Fri, 21 Dec 2012 00:00:00 GMT"
Header set Cache-Control "public, no-transform"
</FilesMatch>
With our static site it’s fine to set this date quite a distance into the future, though the W3C spec suggests not more than one year. A caveat that comes with this style of caching is if you want to update your site, you’ll have to change the names of the artefacts you use or your visitors will potentially see the old images. Or, you could contact every single visitor and ask them to clear their browser cache :)
What does that give us?
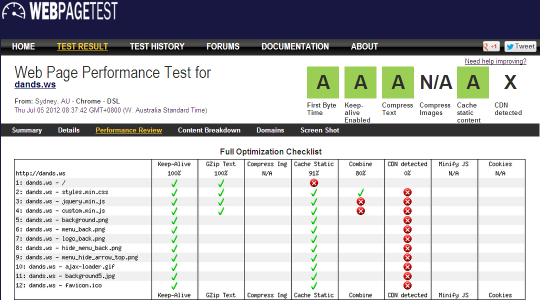
That is a bit better, our content caching and GZIP compression are being recognised.
What about a CDN? A What?
Content Delivery Networks (CDNs) can simply be defined as being a number of well connected servers located around the world and use some (somewhat) magical networking tricks to locate and use the nearest one to the site visitor, these servers cache a chunk of the internet, which obviously improves performance with a lower number of hops across the internet.
Some commonly known providers include Level3, Akamai or MaxCDN, but not too long ago Amazon released Amazon Cloudfront which makes things dead simple.
So how do we use a CDN in a very inexpensive way without spending days of effort?
Setup a Custom-Origin (in Cloudfront)
Go to Amazon CloudFront and signup for an account, it’s associated with your Amazon account, but you need to go through a couple more steps before you can get in there. In my case I had to enter my phone number and an automated system called me immediately, but this step is actually quite slick.
Once in there, click Create Distribution and choose a Download Distribution.

On the next screen, enter your original domain name as the Custom Origin, ie. dands.ws in my case:
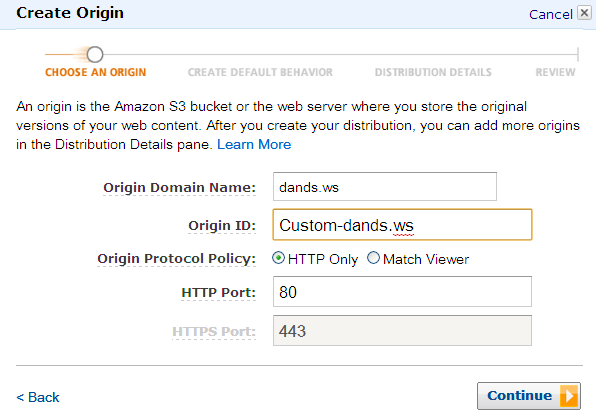
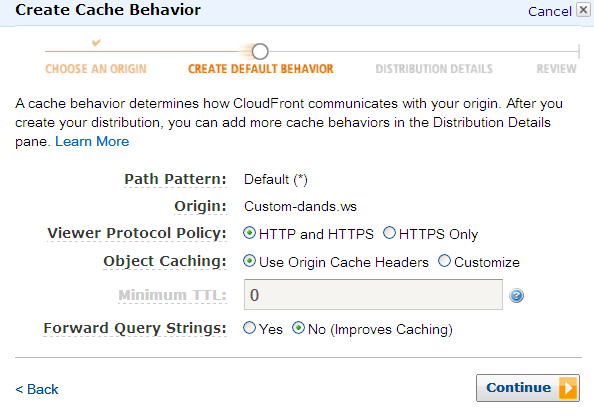
On the next screen you can leave the defaults and just click Continue
On the Distribution Details screen, in the first field, enter the domain of where you’ll point your content at, mine is static.dands.ws. You can log every request to a provided Amazon S3 bucket, for now I’ve just enabled it for some possible future usage.
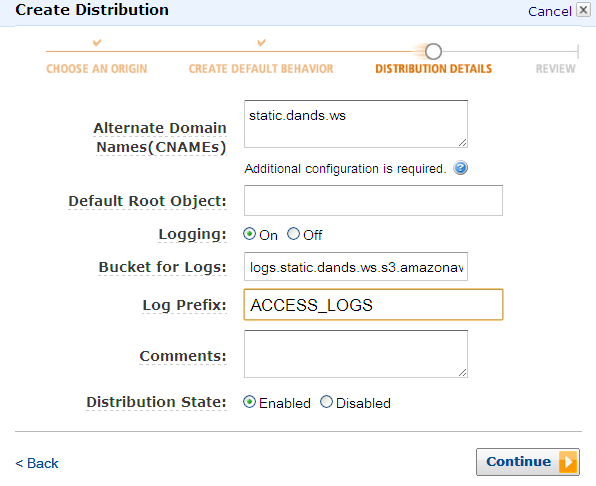
Once you’ve created the Distribution, take note of the domain name that CloudFront has assigned, it’ll be something like “ag9afkj3rk2j.cloudfront.net”.

That’s it for CloudFront, now to setup that CNAME you just used.
Set a CNAME (on your Host/DNS)
Adding a CNAME should be as simple as logging into your hosting or DNS provider and adding one more entry, in my case I’m using Dreamhost.
In the “Manage Domains” screen, choose the “DNS” option for your main domain.
Then find the “Add a Custom DNS record” section:
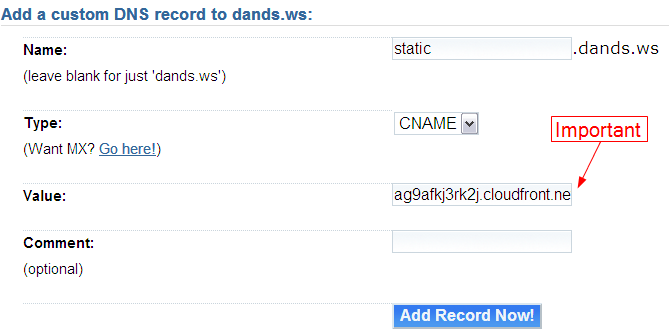
Here, you need to put the same CNAME value you put into CloudFront, i.e. static
In the Value field you need to put the alphanumeric subdomain you got from CloudFront, but be sure to include a trailing fullstop (indicated but not visible).
Click the “Add Record now!” button and there’ll probably be some short wait for the settings to take affect (5 -10 mins).
That’s it for the CNAME.
Change Your Site
The last step and probably most time consuming, is to make your artefacts (images, javascript, css etc) use your new CNAME. Depending on how your site is built, you may just be able to add one more step to your build process to replace a given string with your new CNAME URL, such as this:
//part of my build.xml
<target name="replaceStaticURL">
  <replace dir="${basedir}/build/" value="http://static.dands.ws/">
    <replacetoken>~~|STATIC_URL|~~</replacetoken>
  </replace>
</target>
This is part of my Ant script to move things from my development to my build directory, what I’ve done is placed the ~~|STATIC_URL|~~ delimiter into my source at the various places that I load artefacts. This replace step can then set the source location to wherever I want it. Here’s a snippit from my header.php script:
<script src="~~|STATIC_URL|~~js/jquery.min.js"></script>
<script type="text/javascript" src="~~|STATIC_URL|~~js/custom.min.js"></script>
How Does All This Help?
The way I understand it, goes a little like this:
- A visitor requests an artefact (by viewing a page) from the CNAME’d site
- CloudFront checks its cache
- if the artefact is not found, it goes to your custom origin server and requests the object, which is then put in the cache
- if the artefact is found then it returns it to the visitor
Progress?
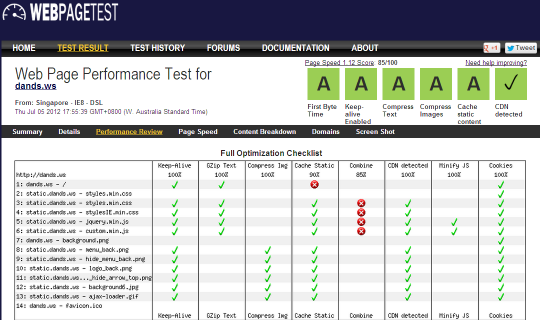
Awesome.
There is one area that WebPageTest has signalled needs a little further attention, combining CSS/JavaScript files. I’m going to ignore this one as I want the flexibility of having my own custom JavaScript with the ability to upgrade the jQuery library version independently. For the CSS files, they’re provided by the theme I based the site on to handle the non-conforming IE versions, so they have to be provided. Ultimately this step will just reduce the number of HTTP requests, so the gains from this point on are likely to be minimal for this low use site.
Minify Artefacts
We’ve made quite an improvement by now, but there are probably a couple more steps you can do to fine tune your static components. JavaScript, CSS and HTML can be “minified” to bring that download size down even further.
The essentially removes all the new lines and depending on the configuration, perhaps rewrite your code to take up less space by way of renaming variables etc.
This can be done by running our artefacts through two tools, YUICompressor and HTMLCompressor. YUICompressor can minify both JavaScript and CSS whilst HTMLCompressor obviously handles your HTML.
I’ll document my process for this in a separate post, but for now here are the various commands I’ve used these tools with:
YUICompressor with CSS
java -jar c:\tools\yui-compressor\build\yuicompressor-2.4.6.jar --line-break 256 --type css -o style.min.css style.cssYUICompressor with JavaScript
java -jar c:\tools\yui-compressor\build\yuicompressor-2.4.6.jar --line-break 256 --type js -o custom.min.js --nomunge custom.jsHTMLCompressor with HTML/PHP
java -jar c:\tools\html-compressor\htmlcompressor-1.5.3\bin\htmlcompressor-1.5.3.jar -t html -m *.php -o .Summary
All told I would’ve spent something like 6 hours over a couple nights (whilst watching The Tour) to get these results.
Does your site need some website performance TLC?
I’m going to spend some time working out how I can improve the performance of this site but at this point the biggest performance drag seems to be wordpress-on-dreamhost (both are great, but I can do better).